DIY Thanksgiving Place Setting Crafts
If there is any silver lining to 2020, it’s having more time with our kids — whether homeschooling, quarantining, or simply socially distancing in your own little pod. Crafting is an excellent way to relieve stress, so we’ve compiled a list of fun, easy Thanksgiving place setting crafts to help you bust boredom, while also adding a personal touch to your table spread.
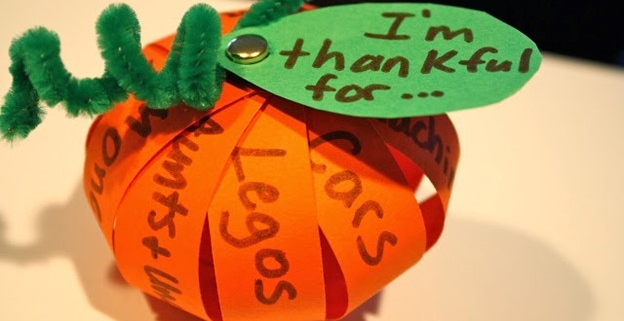
Gratitude Pumpkins
What You Need:
- Brown Marker
- Orange and Green Paper
- Green Pipe Cleaner
- Hole Puncher
- Brads (x2)
- Scissors
How To Do It:
Cut five 8.5 x ¾-inch strips of orange paper. Punch a hole at both ends, and one in the middle, of each strip. Stack the strips on top of each other, placing a brad through the center to hold them together. Fan out the strips to look like an orange sun, writing something your child is thankful for on each strip. Cut out a leaf-shape from the green, write “I’m thankful for…”, and punch a hole in it. Layer the strips on top of each other again, word-side down. Wrap a green pipe-cleaner around the second brad and curl the ends around a pen so they look like curly tendrils. Finally, fasten the brad through the last pumpkin strips holes. Fan the pumpkin back out and voila! You can find more step-by-step photos here.
Spin Art Turkeys
What You Need:
- A Salad Spinner
- Toilet Paper Rolls
- Paper Plates
- Tempera Paint
- Googly Eyes
- Orange foam (or construction paper)
- Red ribbon (or red-painted apple stems)
How To Do It:
Cut your paper plates to fit inside the salad spinner. Pour tempera paint onto the plates – whatever colors your child likes. Spin, spin, spin! Cut slits into the sides of your toilet paper roll. Fold your spin-art tail in half – colored side out – and insert it into the slits. Add googly eyes, red ribbon (or, in a pinch, red-painted apple stems), and an orange foam triangle beak with glue. Follow along at Dilly-Dali Art.
Pumpkin Handprint Photo Keepsake
What You Need:
- Flour (1 Cup)
- Salt (1 Cup)
- Water (1/2 Cup)
- Orange Paint
- Brown Paint
- Twine, Ribbon, or String
- Round Cookie Cutter
- Cookie Stamps
- Small Piece of Cardboard
- Craft Glue
- Photo
- Scissors
- Oven
How To Do It:
Mix flour and salt. Add water. Roll the dough to 1 cm thick. Form a pumpkin shape, reserving a small piece of dough, which you’ll attach on top as the stump. Press your child’s handprint into the center of the pumpkin. Use the cookie cutter to make the circle for the photo. Stamp the date with cookie stamps. Add one hole on either side of the top pumpkin for the string. Bake the pumpkin for three hours at 160 degrees Fahrenheit. Remove from the oven, turn upside-down, and cool overnight. Paint and let dry. Add the string and photo, attaching a piece of cardboard backing with strong craft glue for added stability. Get more info at Teach-Me-Mommy.com.
Windsock Turkeys
What You Need:
- Recycled can – cleaned and dried, with the top and bottom removed
- Brown Paint
- Elmer’s Craft Bond Quick Dry Glue
- Elmer’s Medium Tip Painters Pen (Orange)
- Large Googly Eyes
- Fall Color Ribbons
- Feathers, Felt, or Mix & Match Fall Color Construction Paper
- Masking Tape
How To Do It:
Paint the can brown, allowing it to dry completely before drawing on the orange beak with the Painters Pen and attaching the eyes with Quick Dry glue. Cut 10-15 pieces of ribbon approximately 18”. Cover the inside rims of the can to protect little fingers, and then place rows of glue overtop the tape. On top, attach the turkey tail feathers made from actual feathers, felt, paper, or any combination of materials. On bottom, attach the decorative ribbons. Use the glue to attach a felt waddle and a ribbon for hanging over a chair. Visit Happiness is Homemade if you need more information.
Table Teepees
What You Need:
- Free Teepee Printable
- Double-sided Tape
- Decorative Washi Tape
- Colorful Paper Straws
- Ruler
- Pen
- Scissors
How To Do It:
Print out the teepee templates on white or colored paper. Cut along the solid black lines. Fold along the dotted lines so the bottoms align. Apply double-sided tape to the folded flap to connect the two sides of the teepee. Cut two straws into 5” pieces, taping them in a crisscross to the inside of the teepee. Cut out a banner, write a name on it, and use decorative Washi tape to affix it above the door of the teepee.
If you’re interested in more holiday crafts, inquire about upcoming workshops and classes in New York’s East End. We also do pop-up parties, entertaining the kids while you focus on hosting and conversing with your guests!


